Creating prompts
Use
You use this procedure to create prompts for phone, e-mail, and chat queues. When you have created the prompts, start using them with schedules. For more information, see Creating schedules.
Prerequisites
- Create audio, chat and e-mail prompts.
- View prompt files when you create multiple-step audio prompts.
Creating single-step audio prompts
On the System Configurator main screen, choose and click Add new.
Choose Audio and the prompt type.
In queue message, IVR prompt (only options Play and Pause available), and Queue busy message are used for creating multi-step prompts and the rest are for prompts that have only one step.
In the Basics block, enter a name for the prompt.
The name is shown in .
You can also enter an additional description and an External ID that can be used to identify the prompt, for example, when importing the same prompt to several systems.
In the Steps block, choose the action for the prompt.
When you choose the Play file option, the Define file button is activated. Click the button, search for appropriate prompt file, and choose it from the list.
Save the prompt.
Creating multiple-step audio prompts
On the System Configurator main screen, choose and click Add new.
Choose Audio and the prompt type.
In queue message, IVR prompt (only options Play and Pause available), and Queue busy message are used for creating multi-step prompts and the rest are for prompts that have only one step.
In the Basics block, do the following:
The name is shown in .
You can also enter an additional description and an External ID that can be used to identify the prompt, for example, when importing the same prompt to several systems.
Choose the repetition from the following options:
All Steps
Continuously looping from the start step to the end step
Last Step
Continuously looping the last step
Random Order
Continuously looping random steps
In the Steps block, do the following:
Choose the action for the steps.
For example, for the In Queue Message prompt, the following options are available:
Variable Description Play File A prompt file is played. Pause This defines a pause between played prompts. Current Estimated Waiting Time This option informs the estimated waiting time with the prompt Your average waiting time is....The estimated waiting time calculated:
[current average waiting time of that queue]−[the time the user has already waited]
The calculation is based on the number of current conversations and serving agents, and the estimated time can change very rapidly when the number of conversations and agents is small. Therefore we recommend that you use this prompt only once.
Long-Term Estimated Waiting Time This option informs the estimated waiting time based on the so-called learned or long-term waiting time with the prompt Your average waiting time is.... The waiting time is calculated using also earlier data of real waiting times in the queue. The pronounced waiting time is:[long-term waiting time]−[the time the user has already waited]
It is possible to include other queues into the calculation in .
Position in Queue This informs the current position in queue.
Number of Agents This informs the current number of agents serving in this queue.
Busy This indicates the busy state. For the Play file option, choose the file in Prompt file.
For Current Estimated Waiting Time, Long-Term Estimated Waiting Time, Position in Queue, and Number of Agents choose the number type (Ordinal or Cardinal) and the number’s gender. The latter is only applicable in languages where the numbers change depending on the word to which they refer.
For Pause, enter the value in seconds into the Number value field.
Add other steps in the same way.
You can change the order of the steps by choosing Up or Down.
You can delete unnecessary steps by choosing Delete.
Save the prompt.
Creating chat prompts
-
On the System Configurator main screen, choose and click Add new.
-
Choose Chat and the prompt type.
-
In the Basics block, enter the name that can be seen in the schedule.
You can also enter an additional description and an External ID that can be used to identify the prompt, for example, when importing the same prompt to several systems.
If you are adding a prompt with type In Queue Message, you can also define an interval for looping the prompt until an agent accepts the conversation. Enter the time and select a time unit in the Loop Interval field. The interval can be between 30 seconds and 1 hour. To disable looping, empty the field.
Note:If the system forwards a queueing conversation to another queue, the position in queue is recalculated and it may increase. -
Choose the appropriate language block and enter the prompt text.
For the following prompt types you enter variables that are replaced with real-time numeric data in the prompt by clicking the edit icon:
Prompt Type Variable Description Welcome Message and Disconnection Message Conversation ID ID of a chat conversation that agents can use as a search criterion in Communication Panel and customers as a reference You can define that the Disconnection Message prompt is sent when:
- an agent or a customer clicks the End Chat button
- a customer in WhatsApp types end
- the time defined for the setting Timeout for Idle Chats has been reached
Idle Session Warning Message Idle Session Duration The time the chat conversation has been inactive. You configure the time after which this prompt message is sent to the customer either in: or
If you define the warning time for both channel and queue, queue-level settings override values defined at channel level.
Warning Time for Disconnection The remaining time after which the chat conversation is disconnected. In Queue Message Current Estimated Waiting Time The estimated waiting time is in seconds and calculated as follows:
[current average waiting time of that queue]−[the time the user has already waited]
The calculation is based on the number of current conversations and serving agents, and the estimated time can change rapidly when the number of conversations and agents is small. Therefore we recommend that you use this prompt only once.
Long-Term Estimated Waiting Time The waiting time is in seconds and calculated using also earlier data of real waiting times in the queue:[long-term waiting time]−[the time the user has already waited]
Position in Queue This informs the current position in queue.
Number of Agents This informs the current number of agents serving in this queue.
-
Save your entries.
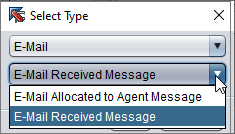
Creating email prompts
On the System Configurator main screen, choose and click Add new.
Choose E-mail and the prompt type.
In the Basics block, enter a name for the prompt.
The name is shown in .
You can also enter an additional description and an external ID that can be used to identify the prompt, for example, when importing the same prompt to several systems.
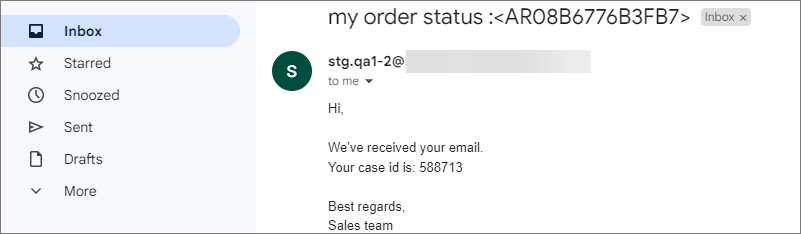
Choose the language block(s) and enter the text you want customers to see in the message.
You can use variables in the Subject field and in the body text by clicking the edit icon and choosing the suitable variable.
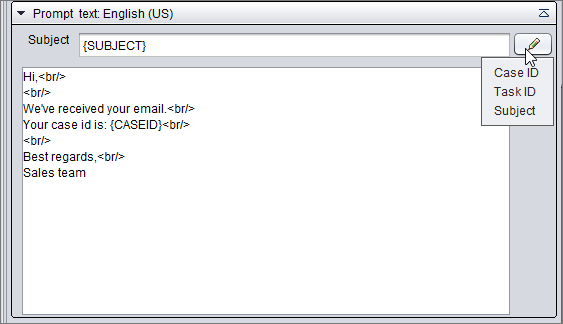
Variables are then replaced with real data in the customer email.
-
Save your entries.