
Installing Python
Before proceeding with EDI configurations in System Configurator, you'll need to install Python as instructed here. This installation includes extensions needed by the EDI framework that can't be included in the Python installation delivered in the Sinch Contact Pro package.
To install Python:
Get the required Python files:
Open Windows PowerShell.
Change the directory using cd and navigate to the Python for CEM directory, which should be under the (../SAP/ContactCenter/install/7.0.xx.x/) directory.
To download the required python files, type .\get-py.ps1 and press Enter. This will:
- Download the Python files and libraries from the web (ensure Internet access is possible) and
- Create content and external folders in your file
system.
The destination depends on arguments passed to the script. If no argument is passed, it will go to the subfolder contents\Python\external of the folder where the get-py.ps1 script is located. During run, the script prints the Python distribution location in the console window: Generating python at location: xxx
Note:If downloading fails with the get-py.ps1 script, it's most likely is a certificate issue. The script downloads from https://www.python.org and https://files.pythonhosted.org. Both certificates are issued by CA which are not trusted by the AWS EC2 instances. You can check this by copying and pasting the URLs into your browser's address bar. The browser will show either a warning or secure connection. If there's a warning, you need to install CA root to trusted root and run the script again. For information about installing certificates, see Certificates in the Installation Guide.
Go to Infrastructure Administrator (IA) and connect to HAC.
-
Make sure IA is in Deployment Mode ().
Right-click on HAC Nodes and then choose Refresh all hosts.
Add Python to virtual units:
Create as many (empty) virtual units as you have CEM instances in your system, for example ExternalPython1 and ExternalPython2.
To create each virtual unit:
-
Right-click Virtual Units in the model tree.
-
Select .
-
Enter the name of the virtual unit and click OK.
-
-
To add the Python for CEM software package to each External Python virtual unit that you created, right-click Software under the virtual unit in the model tree, select , and click OK.
-
To create instances of each External Python virtual unit that you created:
-
Right-click Instances under the virtual unit in the model tree and select .
-
Repeat for each HAC node.
-
-
To commit the changes, choose either (or Apply Changes to Local System) per every HAC node, or right-click the HAC Nodes in the model tree and choose Apply All Changes to All Hosts.
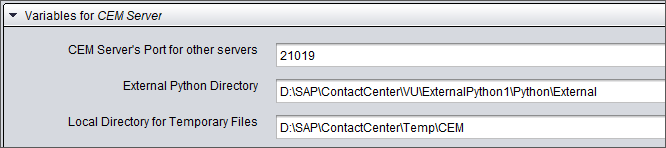
Verify that Python distribution was copied to VU folder of each created virtual unit instance (for example, D:\SAP\ContactCenter\VU\ExternalPython1\Python\External).
Enter the value of the variable External Python Directory under on all CEM virtual units. Enter the full directory path.
Use a naming convention that clearly links ExternalPython and Core virtual units, for example ExternalPython1 – Core1, ExternalPython2 – Core2, and so on.
Inactivate the updated CEM virtual units.
Right-click Virtual Units in the tree and choose Synchronize Instances. From the popup window that opens, select the virtual units and click OK. This advances new changes to all HAC nodes where the changed software package has instances.
To commit the changes, choose either (or Apply Changes to Local System) per every HAC node, or right-click the HAC Nodes in the model tree and choose Apply All Changes to All Hosts.
Note:If the Standard Reports package is installed in the same virtual unit as the reporting website, upgrading the Standard Reports package fails in this step as the package requires that the web site is running. After the next step (activating the virtual units), right-click the Standard Reports package and select the Upgrade Software option.
Activate the updated virtual unit(s).
Note:Make sure that all instances of the upgraded VUs are in status Active or Spare.Save the system model.
Set IA to Monitoring Mode to propagate the new model to all nodes.