Configuring Microsoft Dynamics 365
You can embed Communication Panel in Dynamics 365 Customer Service to use the call functions of Communication Panel.
Dynamics 365 Configuration
- Sign in to your Dynamics 365 account.
If you don't have a tenant set up yet, create one. For more information, see Microsoft Dynamics 365 documentation.
- Click Channel Integration Framework on the top bar.
- Click New.
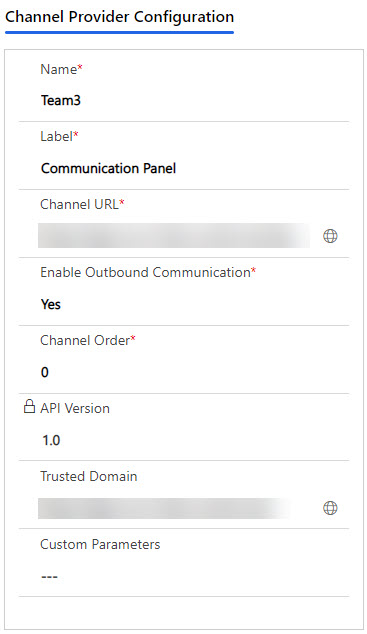
The configuration view for a channel provider opens.
- Enter the following information:
- Name: Enter a name for your channel provider.
- Label: Enter Communication Panel or any other name you want show as a title in the widget area.
- Channel URL: Enter the URL of Communication Panel. This is of format https://login-[region].cc.sinch.com/[Tenant Name]/ecf/[software version]/communicationpanel/index.html
- Enable Outbound Communication: Select Yes.
- Channel Order: Enter 0.
- Trusted Domain: Enter the domain URL. This is of
format
https://login-[region].cc.sinch.com/

- In Select Unified Interface Apps for the Channels, choose the apps.
- In Select the Roles for the Channel, choose the roles.
- Click Click Save & Close.
SC Configuration
With this procedure you enable integration for the users that are linked to this specific user settings template.
- On the System Configurator main screen, choose .
- To create a new template, choose Add New or search for the template to which you want to add the Dynamics 365 integration.
- Choose the Dynamics 365 Integration block.
- To activate the integration, select Enable Dynamics 365 Integration for Phone Channel.
- For Embedded Communication Panel Width (px), enter 550.
- For Dynamics 365 Host Address, enter the URL of your Dynamics 365 tenant.
-
Save your entries.
Using the dynamic My Conversations View
You can open Communication Panel in another browser window and see a dynamic My Conversations view that is responsive to the available frame size in the CRM. For more information, see Configuring the Dynamic My Conversations View.
