Replacing in queue message and using dynamic prompts
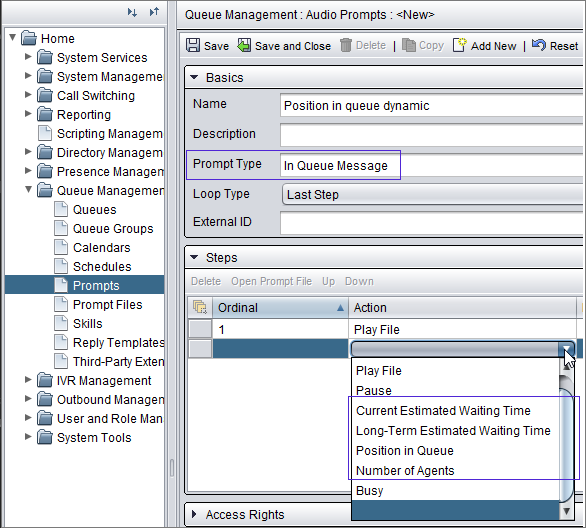
Dynamic prompts are messages that inform customers about things such as number of agents serving, or estimated waiting time. You create this type of a prompt with the prompt type In queue message.
-
tell the position in the queue only once and when the call first arrives to the queue
-
have a separate queue for high priority customers.
-
set set the minimum and maximum values for expected waiting time, position in queue, and how many agents are serving in.
For more information, see Defining prompt settings.
Prerequisites
- Prompt file created
- Rights to view prompt files
- Rights to create audio prompts
- Calendar created if the default calendar isn't used
- Rights to view calendars

Replacing in queue message
-
On the System Configurator main screen, choose and click Add new.
-
Choose Audio and In queue message
-
In the Basics block, enter a description for the prompt file and then choose the In queue message as the prompt type.
-
In the Language files block, click the language column row to choose the language.
-
To add the wav file, use the edit icon.
-
Save the prompt file and click Yes and Open when asked whether to create a prompt to which this prompt file will be linked.
-
Enter a description if needed.
-
Keep the loop type as All steps and save the prompt.
Now add the newly created prompt to a queue.
-
Go to , click Add new and choose Audio prompts and Queue.
Add the queue(s) where you want this prompt to be used.
Choose the calendar.
If you want that the prompt is always used, choose the Default calendar.
-
In the Schedule details, choose In queue message as the prompt type and then choose right prompt for the Default field.
-
Save the schedule.
You have now finished the configuration. It takes some seconds before changes are processed. You can test that the prompt is played by calling to the queue, for example, from Communication Panel or from your mobile phone. First you should hear the welcome prompt and then the new in queue prompt.
Adding dynamic prompts
-
In either search for a in queue message for create a new one.
-
In the Basics block, choose Last step as loop type.
-
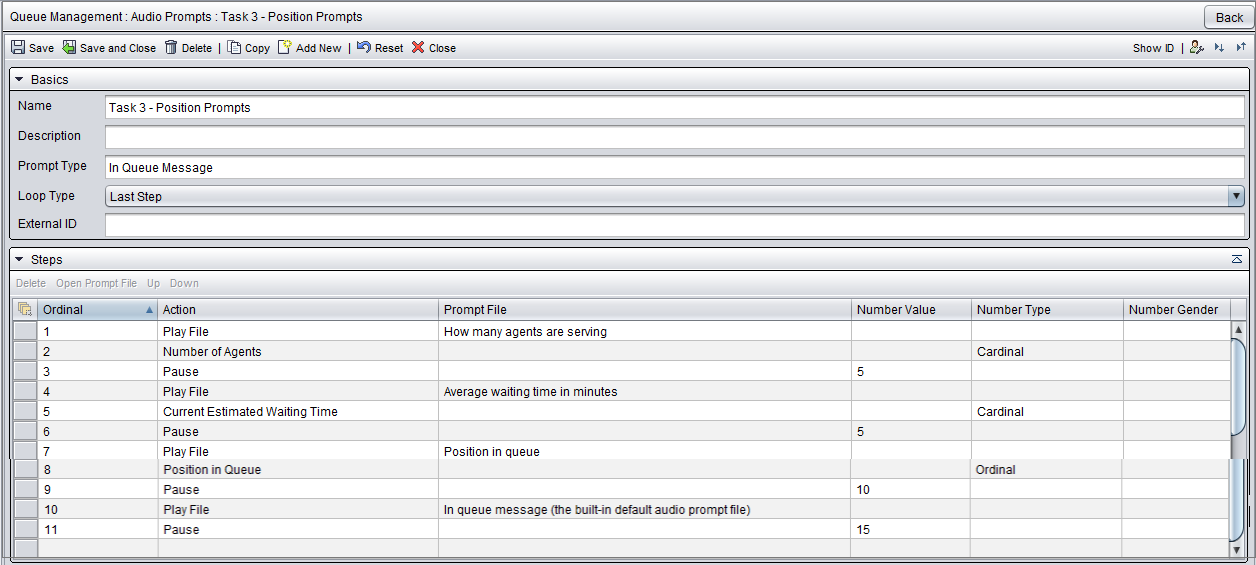
In the Steps block, add the following steps:
-
Click the row in the Action column and choose Play file.
-
In the Prompt file column, click the row and choose the file that plays the number of agents serving.
-
In the next row, choose Number of agents and Cardinal for the number type.
-
Then add a 5-second pause.
-
Do the same for current estimated waiting time: add the prompt file, choose Current estimated waiting time and Cardinal for the number type.
-
Add another 5-second pause.
-
Now add the position in queue prompt. Use Ordinal for the number type.
-
After this add a 10-second pause before adding the in queue message.
-
As a last step, add a pause that lasts for 15 seconds.
The loop type Last step means that the in queue message is played every 15 seconds.
-